
Poco X3 is a budget-friendly flagship device from Poco. After the release, this smartphone has been a hit by Poco, a subsidiary of Xiaomi. However, one of the most common complaints of users of Poxo X3 Pro is the UI or user interface. Even though the device has a powerful Snapdragon 860 processor, many users have complained about the device’s performance. This is because of the custom UI of Xiaomi, MIUI. So, if you want to get rid of MIUI and get a custom ROM on your device, then you just have come to the right place. Below, we have described how you can install custom ROM on Poco X3 pro.
So, all you need to do is to follow the step-by-step guide below to do that. Below, we also have described the best custom ROM for Poco X3 pro. So, you can go through the list, and choose the best custom ROM for your device. After installing the custom ROM, you’ll be able to get a clean and fast performance of your device. So, just follow the guide below, and get the best custom ROM installed on your device. Below, we have provided the guide to do that.
Why Install Custom ROM on Poco X3 Pro?
Before we get into the steps, let’s find out why you should get a custom ROM on your device.
- Speed: With a custom ROM, you’ll get more speed on your device. It’ll make your device fast. So, that’s one reason for getting a custom ROM.
- Clean UI: Usually, most of the popular custom ROM’s come with a clean UI. So, compared to MIUI, you’ll get a clean and simple interface with Poxo X3 pro when you get a custom ROM on the device.
- Root device: After completing the step of installing custom recovery while getting custom ROM, you can root your device as well. So, it’ll help you to use root apps on your Poco X3 pro device.
Requirements
Before we get into the custom ROM installing process, let me tell you the requirements.
- Make sure you take a backup of all your data from your device. When you install a custom ROM, it’ll completely wipe out your device’s internal storage. So, all your data will be lost.
- A PC/laptop is required to unlock the bootloader of the device. Also, Windows OS is preferred.
- The original USB cable is recommended to connect the device to your PC.
- An active Internet connection is also required to download the files.
How to Install Custom ROM on Poco X3 Pro?
After you get these prerequisites, proceed to install custom ROM on your Poco X3 Pro. Below, we have provided the step-by-step guide to do that. So, just follow the guide, and you can get the custom ROM easily.
1. Unlock the Bootloader
The first step is to unlock the bootloader of the Poco X3 Pro device. Without unlocking the bootloader of the device, you won’t be able to install the custom ROM on your device. So, you have to unlock the bootloader and proceed to install the custom ROM on your device.
Below, we have described the step-by-step guide to unlocking the bootloader of the device. So, you can just follow the process to do that easily.
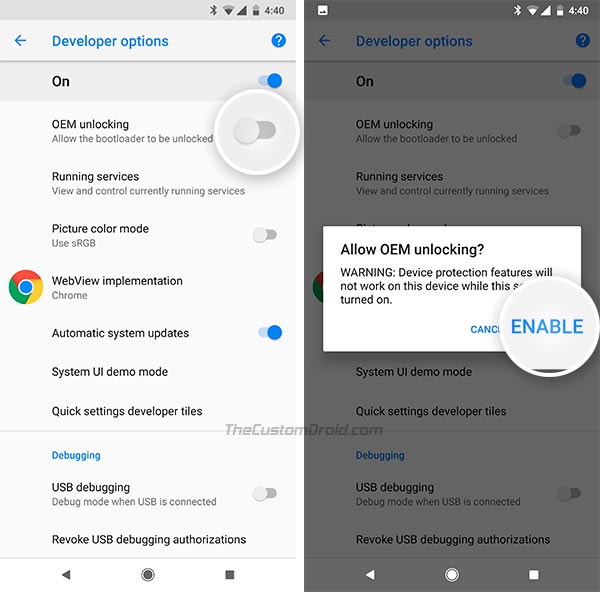
Step 1: Enable OEM Unlocking
To unlock your Poco X3 Pro device’s bootloader, the first thing you need to do is to enable the OEM unlocking option from the setting option of your device. The device has an option where you get the choice to lock or unlock the bootloader. So, you have to turn it off first.
To enable OEM unlocking, just follow the below steps.
- First of all, open the Settings option of your Poco X3 Pro smartphone.
- Now, go to the About Phone option.
- There, you’ll get the ‘Build number’ option. Now, tap on the option 4-5 times until it shows ‘You are now in developer mode’.
- Then, press back and open the Settings option again. Then, search for ‘Developer option’ in the search option. You can also open the Additional Settings option and then go to the developer option from there.
- In the developer option, you’ll get the OEM unlocking option. Confirm the enable, and enable this option.
That’s it. OEM unlocking has been enabled on your Poco X3 Pro device. Now, you can proceed to the next step.
Step 2: Download Required Drivers and Tools
The next step is to download the required drivers and tools on your PC. To connect your Poco X3 Pro device to your PC, you need the drivers to be installed on your PC. These drivers include the fastboot & ADB drivers and Xiaomi drivers. Below, we have provided the download link to these drivers. So, you can download them using the link below, and follow the guide to install them on your PC.
- First of all, download ADB & Fastboot drivers using the link below, and install the drivers on your PC.
[su_button url=”https://adb.clockworkmod.com/” target=”blank” size=”10″ radius=”5″ icon=”icon: download” rel=”nofollow”]Download ADB & fastboot Drivers[/su_button]
- Then, download Xiaomi drivers on your PC and install them.
[su_button url=”https://www.xiaomidriversdownload.com/xiaomi-usb-drivers-official/” target=”blank” size=”10″ radius=”5″ icon=”icon: download” rel=”nofollow”]Download Xiaomi Drivers[/su_button]
- Now, download MI unlock tool on your PC and install the tool.
[su_button url=”https://en.miui.com/unlock/download_en.html” target=”blank” size=”10″ radius=”5″ icon=”icon: download” rel=”nofollow”]Download MI Unlock Tool[/su_button]
That’s it. After you download and install the required tools and drivers, you can proceed to the main step, unlocking the bootloader of the device. Follow the below guide to do that.
Step 3: Unlock the Bootloader
Now, here comes the main step, unlocking the bootloader. After you complete the above steps, proceed to unlock the bootloader of the device. Just follow the step-by-step guide below to do that.
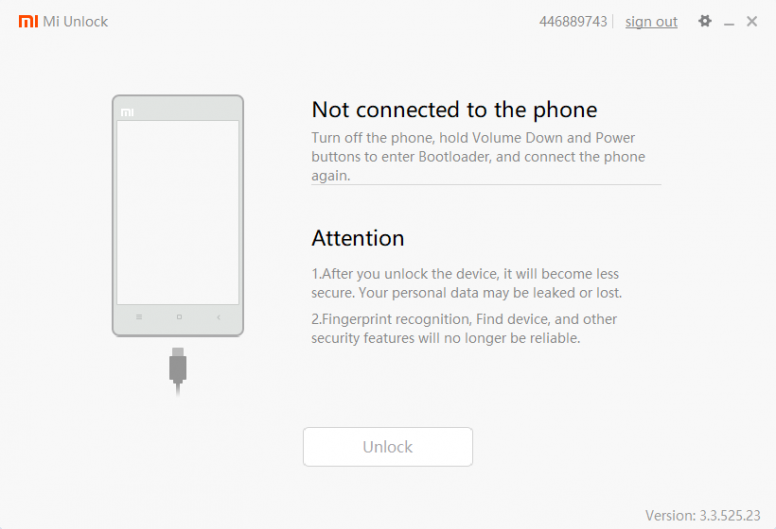
- First of all, open the MI Unlock tool on your PC.
- Then, turn off your Poco X3 Pro device and press the Volume down+Power button to boot your device into fastboot mode.
- When the device is in fastboot mode, connect your device to your PC via USB cable.
- Now, click on the ‘Unlock Now’ option on the MI unlock tool. Then, proceed to unlock the device and click the ‘Unlock Anyway’ option from there.
- That’s it. It’ll start the unlocking process. Just wait until the unlocking process is completed.
After you complete the bootloader unlocking process, you can proceed and install custom recovery on the site. Below, we have described how you can do that.
2. Install Custom Recovery on Poco X3 Pro
To install the custom ROM with the recovery, you have to install a custom recovery on your Poco X3 Pro device. Usually, Android devices come with stock custom recovery. On some devices like Poco, you get the Xioami custom recovery. However, it’s not possible to install the custom ROM on your Poco X3 Pro device with the Xiaomi custom recovery.
So, you have to get a custom recovery and then install the custom ROM with the recovery, Below, we have described how you can do that easily.
Step 1: Download the Custom Recovery on your PC
You need to use your PC in this step as well. The first step is to download your preferred custom recovery on your PC that you want to install on your Poco X3 Pro device.
There are various custom recovery is available for Poco X3 Pro. You can choose from popular custom recoveries like TWRP recovery and OrangeFox Recovery. Although the features of all the custom recoveries are the same, you get interface or UI changes.
[su_button url=”https://twrp.me/” target=”blank” size=”10″ radius=”5″ icon=”icon: download” rel=”nofollow”]Download TWRP for Poxo X3 Pro[/su_button]
[su_button url=”https://androclue.com/orangefox-recovery/” target=”blank” size=”10″ radius=”5″ icon=”icon: download”]Download OrangeFox for Poco X3 Pro[/su_button]
Below, we have provided the download link to TWRP and OrangeFox recovery. So, download the recovery files on your PC first.
After you download the recovery file, copy it and paste it to your Windows PC’s C://>ADB folder.
That’s it. Now, proceed to install the custom recovery on your PC. Follow the below steps to do that.
Step 2: Install Custom Recovery
To install the custom recovery, you can follow the below steps.
- First of all, open the ADB folder on your PC.
- Then, press Shift and right-click on the folder.
- You’ll get the ‘Open PowerShell Window here’ option. Click on it.
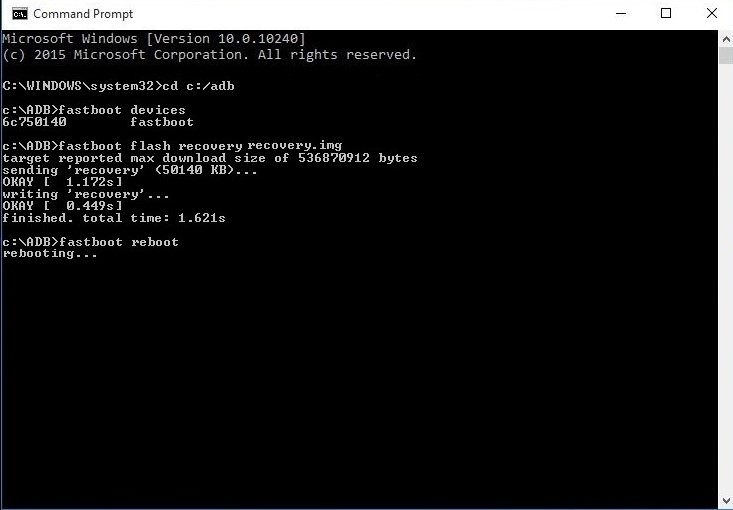
- Now, enter the following command and hit enter.
- fastboot flash recovery recoveryfilename.img (recoveryfilename=Name of the recovery file that you have downloaded)
- That’s it. It’ll show that it has successfully flashed the recovery.
- After flashing the recovery file, you can enter the fastboot reboot command to restart your device.
Now, you can boot the device to the custom recovery by pressing the Volume Up+Power button of the device.
3. Install the Custom ROM on Poco X3 Pro
Here comes the final step. After you complete the above two steps, you have to download and install your preferred custom ROM on the device and install it. Below, we have described how you can do that. So, just follow the step-by-step guide, and complete Poco X3 Pro custom ROM installing process.
Step 1: Download the Custom ROM
Firstly, you have to choose and download your preferred custom ROM on the device. There are various custom ROM is available for Poco X3 Pro. Some of them are official, and some of them are unofficial ROM. So, you can choose from plenty of different custom ROM, and download them on your device. Below, we have described the best custom ROM for Poco X3 Pro. So, you can download one of these ROM and install it on your smartphone.
LineageOS
LineageOS is probably the most popular custom ROM available out there. It was previously known as CyanogenMod. And the latest version of LineageOS is available for Poco X3 Pro as the code name of Vayu. If you want a simple and clean interface, then LineageOS is for you. It provides a stock Android experience on your Poco X3 Pro device without any annoying bloatware. Also, you get frequent updates on your device with LineageOS.
[su_button url=”https://download.lineageos.org/vayu” target=”blank” size=”10″ radius=”5″ icon=”icon: download” rel=”nofollow”]Download LineageOS[/su_button]
Pixel Experience
After the release of Google Pixel devices, the UI of the devices got popular among Android users of other brands. And they wanted to get the same UI on their devices. That’s why the Pixel Experience custom ROM came out. Pixel Experience is a custom ROM based on the UI of Google Pixel devices. It is similar to the stock Android OS. And the latest version of Pixel Experience ROM is available for Poco X3 pro. So, Pixel Experience is another good custom ROM you can get for Poco X3 Pro.
[su_button url=”https://download.pixelexperience.org/vayu” target=”blank” size=”10″ radius=”5″ icon=”icon: download” rel=”nofollow”]Download Pixel Experince[/su_button]
Havoc OS
Havoc OS is a custom ROM, available for various devices including Poco X3 Pro. This custom ROM is mainly based on LineageOS, but you get more customization features in this ROM. So, if you want customizations in your custom ROM, you can get Havoc OS for your device.
[su_button url=”https://havoc-os.com/device#vayu” target=”blank” size=”10″ radius=”5″ icon=”icon: download” rel=”nofollow”]Download HavocOS[/su_button]
Step 2: Install the Custom ROM
After you download the custom ROM, proceed to install the ROM on your device. Below, we have described how you can do that easily.
- First of all, copy the custom ROM to the external storage of your device. If you don’t have an SD card on your device, just plug in an OTG cable, and connect the SD card.
- After copying the custom ROM, boot your device to the recovery mode. You can turn off your device, and press the Volume Up+Power Button to boot the device to recovery mode.
- When the device boots to the recovery mode, click on ‘Wipe’, then select Boot, System, and Data option. Now, swipe to wipe your device.
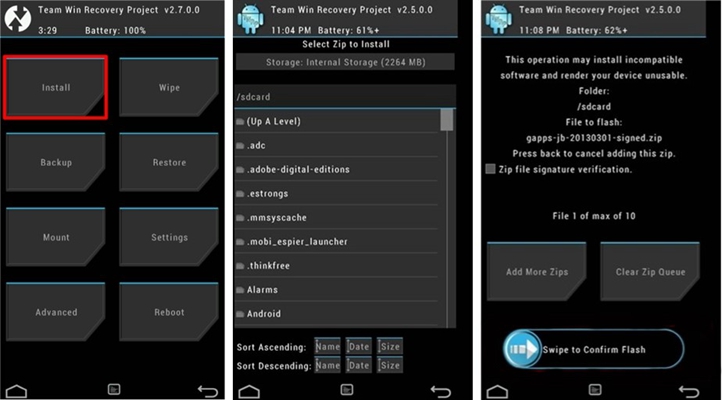
- After wiping the device, press back and click on ‘Install’.
- After that, select the custom ROM file that you have downloaded for your Poco X3 Pro device.
- Again, swipe and confirm installing the custom ROM.
That’s it. After completing the installation process, it’ll show that the custom ROM has been successfully installed on your device. You can reboot to the custom ROM.
Conclusion
It’s not easy to flash a custom ROM on your Poco X3 Pro device. However, when you have the right guide, you can install the custom ROM easily on the device. Above, we have described how you can install a custom ROM on your Poco device. So, if you liked the guide, you can share it on your social media platforms. Just use the share buttons below to do that. Also, if you have any questions or queries, or if you face any issues when installing the custom ROM, you can ask in the comment section below. You can also provide your feedback in the comment section.